⇦ Back to Fertilizer Lime Amendment Technology and Use Home
¶ A. Semi‐Solid or Solid Lot Manure
¶ 1. Suggested equipment
- Soil probe or narrow shovel
- b. Compositing bucket = large, clean plastic bucket (≈ five‐gallon size)
- Large zip‐lock sample bags (≈ half‐gallon size)
- Latex or nitrile gloves
- “Sharpie”‐type permanent marker
¶ 2. From lot surface
- Use soil probe to collect sub‐samples.
- Take a minimum of 20 random cores from pen surface.
- Be careful to remove only manure and not hardened soil beneath.
- Walk entire pen area of the pen in zigzag pattern
- Sample representative pens of same age and similar management.
- Collect core sub‐samples in compositing bucket;
mix thoroughly to form composite
- Remove about one pint to one quart from compositing bucket; place in zipper‐lock bag for final sample.
¶ 3. From stockpiles and dry stacks
- Use shovel to remove samples from several locations along length of stockpile or stack.
- Discard first six inches of surface crust; sample at least 18 inches into the pile.
- Place subsamples in composting bucket.
- Mix subsamples, but do not allow the material to dry.
- Remove about one pint to one quart from compositing bucket; place in zipper‐lock bag for final sample.
¶ 4. Sample preparation and transfer
- Label sample containers with proper information.
- May be useful to “double‐bag” sample containers in case of leakage.
- Refrigerate samples if they cannot be shipped immediately. Do not freeze.
- Pack samples in ice, if required. Ship or deliver to lab as quickly as feasible.
¶ B. Liquid Manure Slurry
¶ 1. Suggested equipment
- PVC pipe (“thief tube”) or toss‐bucket or dipper
- Compositing bucket = large, clean plastic bucket (≈ five‐gallon size)
- Screw‐top plastic sample bottles (as recommended by laboratory)
- Latex or nitrile gloves
- “Sharpie”‐type permanent marker
¶ 2. From slatted‐floor pit
- Use plastic pipe that is open on both ends
- Must be narrow enough to slip through floor slats, but wide enough to collect undisturbed solids.
- Suggest ½‐inch diameter PVC pipe.
- Extend pipe through slats into manure to pit floor.
- Seal or cap upper end of pipe (e.g., place thumb over open end)
- Trap column of manure that has entered lower end of pipe.
- Remove pipe and empty contents of pipe into compositing bucket.
- Take one‐pint to one‐quart subsamples from five or more locations in slatted structure.
- Mix compositing bucket contents
- Remove about one‐pint to sample container for shipping.
¶ 3. From exterior storage basin or tank
- Make sure stored manure has been agitated and well mixed.
- Requires liquid manure chopper‐agitator pump or propeller agitator.
- Before spreading, use bucket‐toss or dipping method.
- Bucket‐toss method
- Attach rope attached to small plastic bucket.
- May help to tape flat‐iron weight(s) securely to bottom of bucket.
- Helps bucket to sink during sampling
- Warning: Tape securely! If weights are lost during sampling, could damage agitation equipment
- Pull bucket slowly back to shore.
- Warning! Do NOT wrap rope around wrist or arm, in case rope becomes tangled in agitator.
- Pour portion of small toss‐bucket contents into compositing bucket.
- Repeat from at least five pit locations.
- Mix contents of compositing bucket thoroughly to form composite sample.
- Collect portion of composite sample in sampling container for shipping.
- During spreading, while emptying storage structure
- Remove sample from agitator pump if it has valve on return line.
- Remove sample from manure spreader and place in plastic bucket.
- Mix bucket contents thoroughly to form composite.
- Remove about one pint of bucket contents into nonmetallic sample container for final sample.
¶ 4. Sample preparation and transfer
- Label sample containers with proper information.
- May be useful to “double‐bag” sample containers in case of leakage.
- Refrigerate samples if they cannot be shipped immediately. Do not freeze.
- Pack samples in ice, if required. Ship or deliver to lab as quickly as feasible
¶ C. Liquid lagoon effluent
¶ 1. From flush system
- Collect about one pint of recycled lagoon liquid from inflow pipe to flush tanks
- Save in nonmetallic sample container for final sample.
¶ 2. From open lagoon or runoff‐control‐structure (RCS)
- Use composite sampler, bucket‐toss, or dipping method.
- Composite sampler generally most accurate.
- Warning! Use caution because sides of structure may be steep and slick. Recommend having second‐person observer for safety reasons.
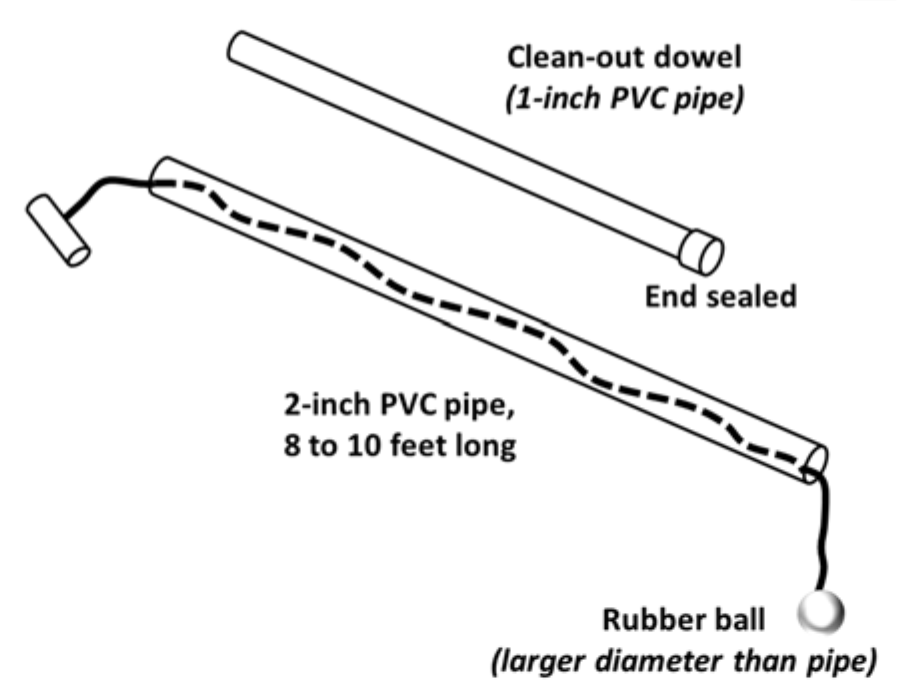
¶ 3. Composite sampler
- Requires 8‐foot to 10‐foot length of PVC pipe (1/2inch to 2‐inch diameter).
- Use hand to plug top end.
- Alternate: Use rope‐and‐ball to plug bottom end (see Figure 1).
- Brush away floating debris from surface.
- Extend pipe into storage about 6 feet away from edge of structure.
- Extend pipe to bottom of storage, if feasible.
- Avoid plugging tube with bottom sludge
- Use clean‐out dowel to clear tube, if needed
- Repeat at five or more locations around lagoon or RCS.
- Mix contents of compositing bucket thoroughly to form composite sample.
¶ 4. Collect portion of composite sample in sampling container for shipping.
¶ Figure 1. Composite Column Sampler
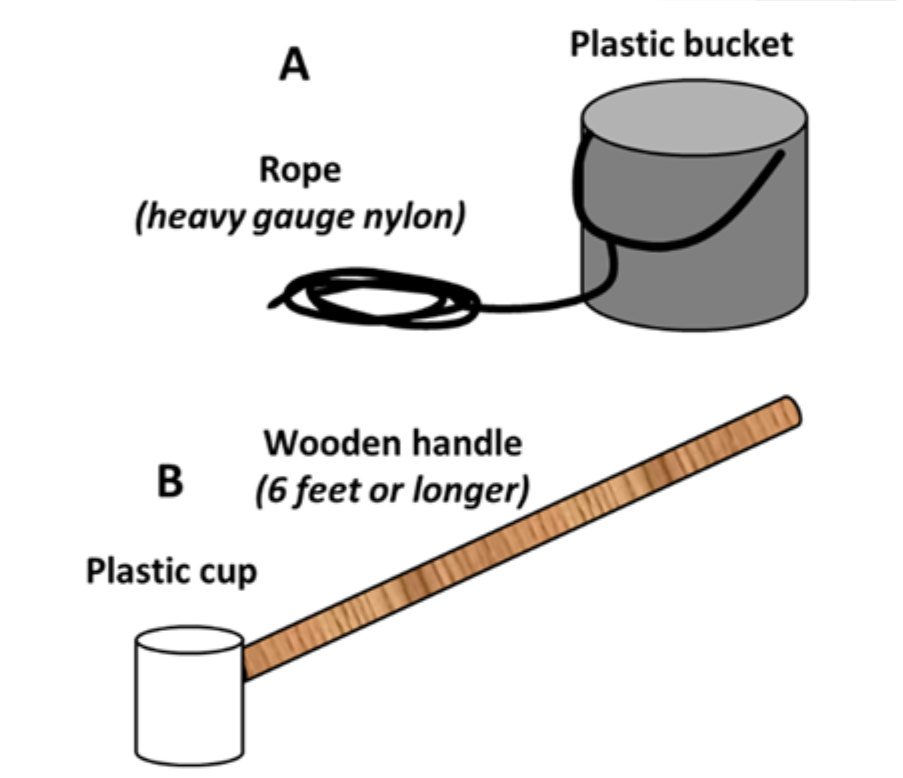
¶ 5. Bucket‐toss method
- Attach rope attached to small plastic bucket (see Figure 2a).
- May help to tape flat‐iron weight(s) securely to bottom of bucket.
- Helps bucket to sink during sampling
- Warning: Tape securely! If weights are lost during sampling, could damage agitation equipment.
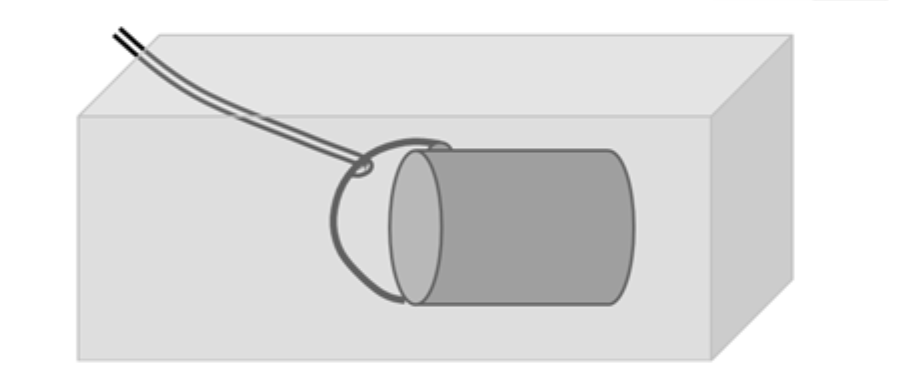
- Pull bucket slowly back to shore (see Figure 3).
- Be careful not to collect scum or solids with the sample
- Warning! Do NOT wrap rope around wrist or arm, in case rope becomes tangled in agitator.
- Pour portion of small toss‐bucket contents into compositing bucket.
- Repeat at five or more locations around lagoon or RCS.
- Mix contents of compositing bucket thoroughly to form composite sample.
- Collect portion of composite sample in sampling container for shipping.
¶ 6. Dipper method
- Attach open‐mouth plastic bottle or plastic cup (one‐half pint size or less) securely on end of 10foot to 15‐foot pole (see Figure 2b).
- Extend bottle 10 to 15 feet away from bank edge.
- Brush away floating scum or debris.
- Submerge container about one foot below liquid surface.
- Empty into compositing bucket.
- Repeat at middle and bottom at same location, if feasible.
- Repeat at five or more locations around lagoon or RCS.
- Mix contents of compositing bucket thoroughly to form composite sample.
- Collect portion of composite sample in sampling container for shipping
¶ Figure 2. Toss-Bucket and Dipper Samplers
¶ 7. Sample preparation and transfer
- Label sample containers with proper information.
- May be useful to “double‐bag” sample containers in case of leakage.
- Refrigerate samples if they cannot be shipped immediately. Do not freeze.
- Pack samples in ice, if required. Ship or deliver to lab as quickly as feasible
¶ Figure 3. Toss-Bucket Sampling Method
¶ D. During land application
¶ 1. Sometimes easier to get representative sample during application.
- Total nitrogen concentration may be lower than samples collected from storage because some ammonia may be lost during application.
¶ 2. Suggested equipment
- Catch cans or plastic tarp
- Compositing bucket = large, clean plastic bucket (≈ five‐gallon size)
- Screw‐top plastic sample bottles (as recommended by laboratory)
- Latex or nitrile gloves
- “Sharpie”‐type permanent marker
¶ 3. “Catch can” method
- Especially useful if slurry is spread from honey wagon or tank truck.
- Place a number of “cans” at random locations.
- Suggest using 5‐quart plastic buckets for “cans”.
- Collect waste from cans into compositing bucket immediately after application.
- Mix contents of compositing bucket thoroughly to form composite sample.
- Collect portion of composite sample in sampling container for shipping.
¶ 4. “Big gun” irrigation applicators
- Some applicators have spray riser valve used to drain hoses.
- Place compositing bucket under valve.
- Open valve while the gun is running
- Warning! Open slowly! Big guns operate at high pressures.
- Collect several samples while pumping.
- If no valve is available, use “catch can” method above.
- Mix contents of compositing bucket thoroughly to form composite sample.
- Collect portion of composite sample in sampling container for shipping.
¶ 5. Sprinkler irrigation
- Impact sprinklers and LEPA spray nozzles work at lower pressures than big guns.
- Collect sample(s) from spigot or valve if available.
- Is safe to collect sample directly from spray stream if no valve is available
- Place bucket or cylinder directly in the stream
- Collect samples at different locations.
- If no valve is available, use “catch can” method above.
- Mix contents of compositing bucket thoroughly to form composite sample.
- Collect portion of composite sample in sampling container for shipping.
¶ 6. Solid manure spreading
- Spread tarp in field ahead of applicator
- Suggest tarp size of 6’x6’ or larger
- Avoid placing directly in front of wheels.
- Suggest tarp size of 6’x6’ or larger
- Catch manure from single pass and place in compositing bucket.
- Repeat several times during different passes.
- Mix contents of compositing bucket thoroughly to form composite sample.
- Collect portion of composite sample in sampling container for shipping.
¶ 7. Sample preparation and transfer
- Label sample containers with proper information.
- May be useful to “double‐bag” sample containers in case of leakage.
- Refrigerate samples if they cannot be shipped immediately. Do not freeze.
- Pack samples in ice, if required. Ship or deliver to lab as quickly as feasible.
¶ References
Barker, J. 1984. Livestock Waste Sampling, Analysis, and Calculation of
Land Application Rates. Pub. #EBAE 11184. North Carolina Cooperative Extension Service. http://www.bae.ncsu.edu/bae/programs/extension/publicat/wqw m/ebae111_84.html accessed 8/11/2004
Peters, et. al. 2003. Recommended Methods of Manure Analysis. Pub. A3769. Univ. of Wisconsin Coop. Ext., Madison WI. pg. 1‐4.
Wallace, T. 2008. Sampling Liquid Manure for Analysis. The Cattle Site,
08 February 2008. http://www.thecattlesite.com/articles/1307/sampling‐liquidmanure‐for‐analysis/ accessed 20Jan2020.
Zhang, Hamilton, & Britton. Sampling Animal Manure. Pub. F‐2248.
- Oklahoma Cooperative Extension, Stillwater OK. 4 pg.